Preface
This manual provides information on handling, jointing and installation of Alcorr Double Wall Corrugated (DWC) Polyethylene (PE) piping systems — henceforth referred to as the DWC PE Piping System — for non-pressure applications in drainage, sewerage and cross-drainage (pipe culvert) installations.
The information contained in this manual is intended as a guide and shall be applied in adherence with national laws, codes and project specifications, and adapted as required by site conditions. National safety regulations and guidelines must be followed during all phases of construction including foundation preparation, excavation, pipe transportation, handling, assembly and backfilling. These products are intended solely for the non-pressure (gravity) conveyance of water and waste water.
Product Identification
As part of the product marking system, the following information is generally marked on the body (outside) of the pipe:
Transportation & Handling
Handling & Transportation
The transportation of DWC PE pipes is considerably simpler than for conventional rigid pipes such as NP Concrete or Glazed Stone Ware (GSW), owing to their light weight and ease of handling. These pipes can be transported by road or rail, and can also be carried manually where no other means of transport are available — for instance, in marshy lands or remote rural areas.
Loading pipes onto transport vehicles in a telescopic (nested) arrangement is recommended where the consignment permits — smaller-diameter pipes are inserted into the next-larger size, each pipe having a standard length of 6 metres. Stacking can be carried out to a height of 2.5 metres.
Nested loading carries up to 10 times more pipes than equivalent rigid-pipe transport, reducing logistic and handling costs and substantially lowering the carbon footprint through fewer transport trips. While loading, spigot and coupler ends shall be arranged alternately in successive layers to avoid damage.
Unloading
A flat, debris-free area away from construction traffic shall be set aside for stacking and storage. Pipes can be unloaded by carefully rolling and lowering from the delivery truck — manually, or with simple tools and tackle. The pipe can then be lifted and carried manually using a sling arrangement at mid-points or third points, as shown below.
Recommended Manual Handling Methods
| ID (mm) | Approx. Weight (kg/m) | Handling Method |
|---|---|---|
| 75 | 0.59 | Labour (manual carry) |
| 100 | 0.87 | Labour (manual carry) |
| 135 | 1.30 | Labour (manual carry) |
| 150 | 1.60 | Labour (manual carry) |
| 170 | 1.75 | Labour (manual carry) |
| 200 | 2.40 | Labour (manual carry) |
| 250 | 4.00 | Labour (manual carry) |
| 300 | 5.00 | Labour (manual carry) |
| 400 | 8.90 | Labour (manual carry) |
| 500 | 11.80 | Sling at mid-point |
| 600 | 22.00 | Sling at third-points |
| 800 | 36.00 | Sling at third-points |
| 1000 | 57.00 | Sling at third-points |
Jobsite Storage
Pipes may be stockpiled for temporary storage in a flat, debris-free area away from construction traffic. Begin the stockpile with secured timbers spaced at third-point intervals across the width. For pipes with on-line couplers, alternate the orientation of pipe lengths so couplers do not confront each other — up to three pipes can be placed before alternating direction. Subsequent layers shall follow the same pattern, with fewer pipes per layer, giving the stockpile a truncated-pyramid profile.
- Maximum stockpile height: 2.0 m for safe manual handling.
- Smaller diameters can be nested inside larger diameters to minimise storage footprint.
- Factory-supplied rubber sealing rings (IS 5382) shall remain on spigot ends, protected between corrugations.
- Off-line couplers, fittings and accessories shall be stored away from construction traffic, protected from damage and theft.
- Pipes shall not be dropped, dragged, bumped or climbed upon.
Installation
A Class SN 8 DWC PE pipeline installation is a composite of three interacting systems: the pipe itself, the engineered 'Backfill Envelope' surrounding it, and the undisturbed native soil beyond the trench wall. Together these distribute external loads and protect pipe geometry through the service life of the installation.
Trench Excavation
Trench width shall be no greater than is required to safely place, compact and construct the 'Backfill Envelope' on the lower, upper and either side of the Alcorr piping system. Trench width depends on the backfill material, compaction method and pipe diameter. International guidelines establish trench width as the greater of: outside diameter plus 0.4 m, or 1.25 times the outside diameter plus 0.3 m.
Overly wide trenches are not only costly to excavate and refill — they can also detract from the structural integrity of the PE-pipe / 'Backfill Envelope' / native-soil composite system. Undisturbed native soils contribute significantly to structural integrity when trenches are kept relatively narrow.
| Pipe Internal Dia (mm) | Trench Width (m) |
|---|---|
| 75 | 0.60 |
| 100 | 0.60 |
| 135 | 0.60 |
| 150 | 0.60 |
| 170 | 0.60 |
| 200 | 0.60 |
| 250 | 0.70 |
| 300 | 0.75 |
| 400 | 0.90 |
| 500 | 1.10 |
| 600 | 1.20 |
| 800 | 1.30 |
| 1000 | 1.80 |
Excavated spoils shall not be deposited in close proximity to the trench, to prevent collapse of the sides. Trench sides shall be supported by shoring or M.S. sheet piling where necessary. DWC PE pipes may be laid along very wide, smooth curvatures without transitional manholes, owing to their inherent flexibility.
Shoring & M.S. Sheet Piling
Protective shoring shall be strong enough to prevent caving of trench walls or subsidence of adjacent areas. Simple shoring comprises 38–50 mm thick × 300 mm wide timber planks set vertically at close intervals and firmly strutted at the requisite horizontal layers. The topmost cross-strut layer shall extend beyond the shoring framework to rest on adjacent native soil for adequate protection.
In non-cohesive soils with high groundwater tables, continuous interlocking M.S. sheet piling may be necessary to prevent excessive soil movement due to groundwater percolation. Such sheet piling shall extend sufficiently below the trench bottom unless the lower soil strata are adequately cohesive.
When M.S. sheet piling is used, the recommended construction sequence is:
Underground Services
Underground public and private utility services exposed during excavation shall be effectively supported under the guidance of the service owners.
Dewatering
Sewer installation trenches shall be kept free of water during pipe placement at proper gradient, until the pipe is integrated into the already-laid segment through joint assembly. Pumped water shall be discharged continuously to a nearby drainage system or to the completed downstream portion of the sewer line.
Foundation Preparation
A sound installation begins with a stable foundation. The trench bottom shall be slightly over-excavated to allow for bedding material, and shall be free of large stones, soil lumps and debris. Over- or under-excavation may be required to remove rock outcroppings, muck or other unsuitable materials.
Prevention Against Flotation
The light weight of DWC PE pipe is desirable for its structural integrity, hydraulic efficiency and ease of handling — but the same characteristic makes thermoplastic pipes prone to flotation. When the uplift on a pipe exceeds the downward force of self-weight and overburden load, the pipeline can rise or heave. Where flotation is a possibility, proper installation and/or anchorage are imperative.
| Nominal Diameter (mm) | Nominal OD (mm) | Weight Wpipe (kg/m) |
|---|---|---|
| 135 | 160 | 1.30 |
| 150 | 180 | 1.60 |
| 170 | 200 | 1.75 |
| 200 | 238 | 2.40 |
| 250 | 295 | 4.00 |
| 300 | 358 | 5.00 |
| 400 | 480 | 8.90 |
| 600 | 715 | 22.00 |
| 800 | 950 | 36.00 |
| 1000 | 1200 | 57.00 |
| Nominal Diameter (mm) | Minimum Cover 'H' (mm) |
|---|---|
| 135 | 105 |
| 150 | 119 |
| 170 | 132 |
| 200 | 158 |
| 250 | 194 |
| 300 | 239 |
| 400 | 322 |
| 600 | 476 |
| 800 | 636 |
| 1000 | 803 |
Where adequate soil cover cannot be provided to prevent flotation, one of two anchorage methods may be used:
Saddle-shaped precast weight seats over the pipe crown and is secured with steel straps wrapped fully around the pipe.
Commercial helical screw anchors with a transverse strap beam maintain pipe embedment grade and alignment under buoyant uplift.
Laying & Jointing
Owing to the light weight and user-friendly push-fit jointing of DWC PE pipe (no on-site welding is required), assembly at ground level and subsequent lowering of the assembled pipe segment — preferably from manhole to manhole — by manual means with simple tools and tackle is recommended. Where site conditions do not permit this method, individual pipes shall be lowered into the trench manually or with simple equipment, depending on pipe size and trench conditions.
Laying Procedure
For shallow trenches: Place the pipe manually on the bedding portion of the 'Backfill Envelope' at the proper slope, using a sight rail and fixed tee to maintain line and grade.
For deep trenches with timber shoring or M.S. sheet piling:
Jointing Procedure
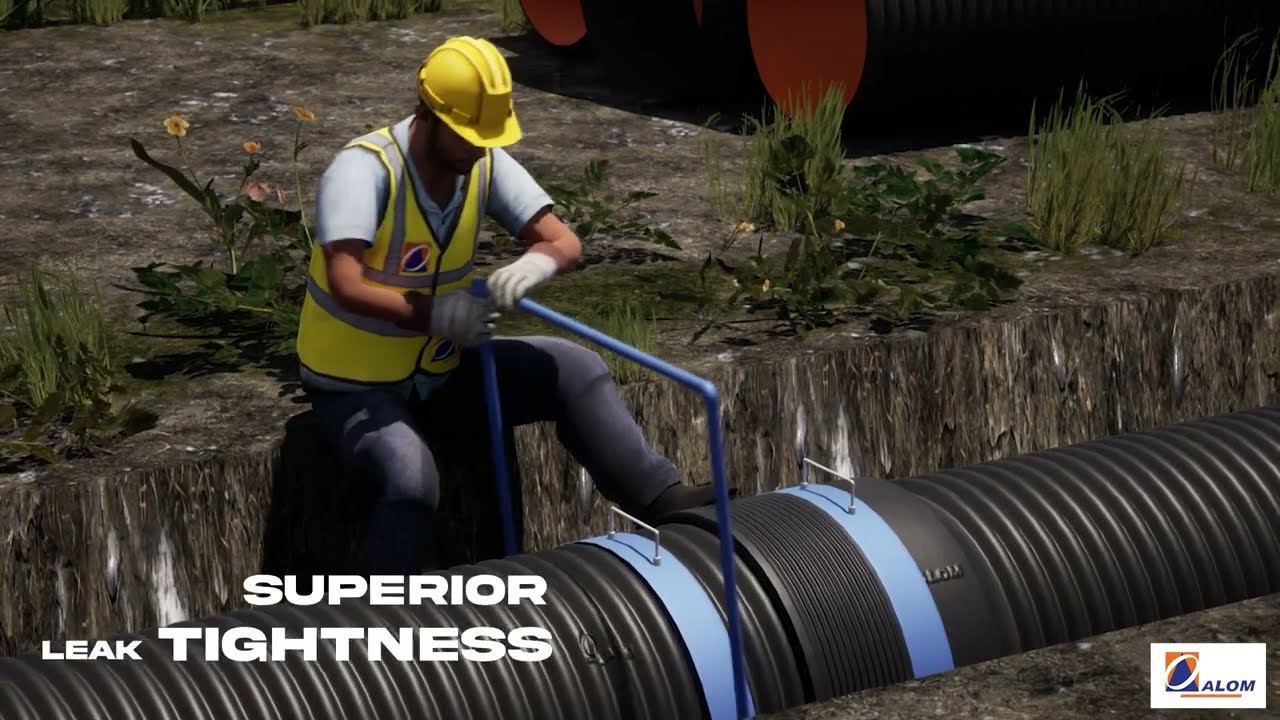
Various push-fit jointing methods are used, including on-line or off-line couplers fitted over spigot ends. The moulded on-line coupler — or separately manufactured off-line coupler — has an internal surface profiled with ribs to receive the non-coupler end of the next pipe.
On the first valley of the corrugated spigot end (the end destined to receive the coupler), one rubber sealing ring shall be fitted snugly. The coupler is then rolled on manually using simple tools and tackle. This provides sufficient gripping lock and a leak-proof joint.
The same jointing system is used for fabricated accessories and moulded fittings such as tees, bends, elbows and reducer end-caps.
- The non-coupler (spigot) end shall be thoroughly cleaned and free of foreign material.
- Use a clean rag or brush to apply lubricant to the non-coupler end.
- Clean and lubricate the coupler end and the sealing ring in the same manner.
- Keep the lubricated end free from dirt, backfill material and foreign matter.
- Push the coupler end onto the spigot by sliding it over the rubber sealing ring after proper alignment.
Curved Alignments
The capability to install pipe in a slightly curved line allows a sewerage or drainage system to follow road bends or to avoid existing utilities, without fittings or manholes. Curvature, where required, shall be established only at joint locations. Depending on the jointing system, a few degrees of angular misalignment can be obtained while maintaining joint integrity. If the required misalignment is insufficient, the pipe can be cut into shorter sections and rejoined, or a fitting may be used.
Field Cutting & Connections
DWC PE pipe is easy to cut with a hand saw or similar tool. For pipe to be connected to a manhole or catch basin, the cut shall be made in the corrugation valley. If pipe is cut to rejoin to another length, an off-line coupler and rubber sealing ring shall be used to ensure optimal joint performance.
Backfill Envelope
The 'Backfill Envelope' encompasses the bedding, haunching and remaining backfill zones surrounding the pipe. It is the critical structural element that distributes loads and maintains pipe geometry throughout the service life of the installation.
Bedding Portion
Bedding is the lower portion of the 'Backfill Envelope', placed directly on the foundation. It shall provide uniform, firm support for the pipe and maintain pipe grade. Minimum bedding depth: 100 mm for pipes DN 400 and below; 150 mm for pipes above DN 400. Coupler holes (depressions in the bedding) are required to accommodate coupler connections without creating stress points.
Haunch Portion
The haunching area provides the majority of resistance against soil overburden and live (traffic) loads. Backfill shall be shovelled and knifed under the pipe, taking care to fill all voids. Compaction shall be conducted uniformly on each side of the pipe in layers, without disturbing pipe alignment. 'Backfill Envelope' construction continues from bedding level up to the pipe springline.
Remaining Portion (Above Springline)
This zone extends from the pipe springline to a minimum of 0.15 m above the pipe crown. It shall be placed and compacted in layers. Mechanical compactors shall not be applied directly on the pipe.
Final Backfill
Final backfill extends from the top of the 'Backfill Envelope' to the bottom of the proposed road crust. Total minimum cover in trafficked installations: 0.45 m for pipe sizes 450 mm and below; one pipe ID for sizes above 450 mm. For heavily trafficked roads requiring immediate restoration, a high-strength material and adequate compaction level are necessary to prevent settlement. Screened native soils are often suitable for final backfill in non-critical installations.
Compaction Methods
Compaction shall not alter pipe alignment. Two standard methods are recognised:
- Tampers: A hand-held pole tamper is suitable for moderate compaction. The tamping face shall be limited to 0.15 m × 0.15 m.
- Rammers: Impact-action rammers work well on soils with significant fines; water content needs close monitoring. Rammers shall not be used directly on the pipe.
Construction Loads
Heavy construction vehicles can impose unanticipated loads on a pipe with less than 1 m of cover. The preferred solution is to route construction traffic away from the pipe. Where this is not possible, additional compacted soil shall be mounded over the pipe to achieve at least 1 m of cover at the pipe crown.
System Inspection & Testing
Pipe installations, like any engineered system, benefit from frequent inspections to confirm that work has been done to specification. Improperly installed flexible pipe can often be detected by simple visual inspection soon after installation, before the pipe is put into service. Closed-circuit television (CCTV) inspection can be used for pipes that are inaccessible due to small diameter or safety hazards.
Deflection Testing
The internationally adopted Structural Design Method for Corrugated Polyethylene Pipe limits initial deflection — measured at the conclusion of 'Backfill Envelope' construction and subsequent backfilling — to 8.0% of the base diameter. A visual or CCTV inspection is generally all that is required to confirm installation quality.
Water-Tightness Testing
Although the system is designed for non-pressure conditions, pipe joints may need to be watertight — particularly for sanitary sewers and storm sewers in environmentally sensitive areas. Testing is carried out at 2.5 m water head for a duration based on the length and size of the conduit system.
Each section of DWC PE sewer shall be tested for water-tightness, preferably between manholes.
On-Site Repair Methodology
1. Leakage from Coupler Joints
2. Damage / Crack at Coupler End
Installation Video
The following video provides a complete visual walkthrough of the Alcorr DWC PE pipe installation process, covering handling, jointing, laying, and backfilling procedures described in this manual.
Click to watch on YouTube
Summary
Storage & Handling
Pipes can usually be handled manually. For larger sizes, padded straps and hoisting equipment are required. Never drop, drag or climb on stockpiled pipes. Maximum stack height: 2.0 m.
Backfill Envelope
Place and compact in uniform layers on either side of the pipe. Extend at least 0.15 m above pipe crown. Never apply mechanical compaction equipment directly on the pipe.
Minimum Cover
Total minimum cover in trafficked installations: 0.45 m for DN ≤ 450 mm; one pipe ID for DN > 450 mm. Shoring or M.S. sheet piling required where specified.
Field Modification
Pipe is easily cut with ordinary tools. Cut in the corrugation valley for manhole connections. Contact the manufacturer for rejoining recommendations to ensure optimum joint performance.
Inspection
Visual inspection or CCTV for inaccessible pipes. Maximum initial deflection: 8% of base diameter. Watertight systems require 2.5 m head pressure testing after installation.
Water-Tightness
Water level must remain constant for 72 hours after the initial 30-minute stabilisation. Make-up water during any 10-minute window shall not exceed 10% of the test section volume.